How to Upload Routes to Garmin 810
The Garmin Edge series of cycling computers is roughly divide into 2 categories: Those that have a mapping part, and those that don't. Mapping in this case means that the units also have routable navigation – only like your car GPS does. Whereas the cycling GPS units without mapping may exist able to follow a breadcrumb trail, but can't route y'all on bodily streets or provide visual maps. They're more similar an Compose-a-Sketch than a phone with useful maps.
The challenge though with the higher end mapping units (Garmin Edge 705/Border 800/Border 810/Border m) is that as expensive equally they are, they don't actually include any maps. Well, ok, I'll be fair. They technically exercise include what's known as a 'basemap'. However said basemap believes there are (for case) only 3 streets in New York City, and two in Paris. Manifestly with such completely useless maps, you're not going to exist able to navigate very far – or very accurately.
So instead yous need to purchase more detailed maps, typically at a cost of $70-$110 per region/expanse. The definition of a region varies – both in size as well as the type of map. No matter the case, y'all're spending more money on peak of what you already spent.
Now in that location's ever been a gratis mapping selection, merely information technology hasn't been until semi-recently that the process of getting these maps has been made really like shooting fish in a barrel. I outlined this inside the Edge 810 review, but I wanted to call it out and make it more accessible – especially to all those owners of Edge 520/705/800/810/thou units (besides useful if you want to add maps for a region other than y'all've already bought). Additionally, I've simplified those instructions some.
So hither's step-past-stride instructions for how to get the complimentary Openstreet maps onto your Garmin Border device.
This page is applicable to all the post-obit unit of measurement types: Edge 520, Edge 520 Plus, Edge 530, Border 800, Edge 810, Edge 820, Edge 830, Border 1000, Border 1030, Edge Explore, Edge Touring, equally well as Fenix 5X (but non Fenix 5/5S), and Fenix 5 Plus (including Fenix 5s Plus and Fenix 5x Plus).
Requirements:

Despite how long all these screenshotted steps may wait, the whole procedure is actually actually quick and super like shooting fish in a barrel. It's just that I was probably overly thorough in the screenshots.
Active fourth dimension: 5-8 minutes
'Blistering' Time: A number of hours
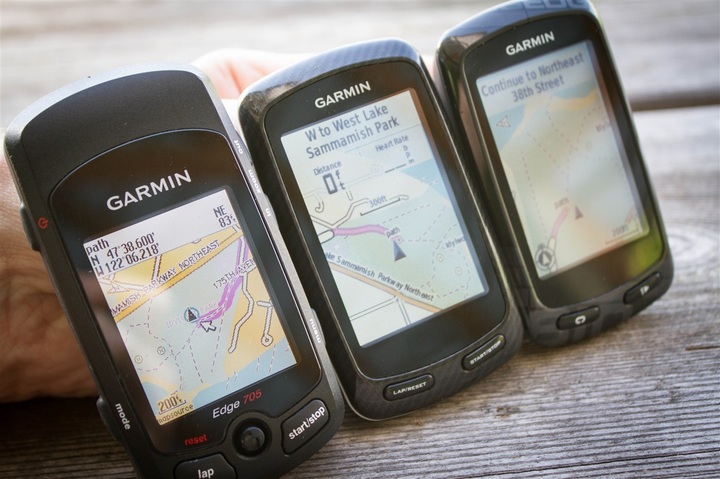
Device: Garmin Edge 520, 705, 800, 810, 1000
Storage: A $12 Micro-SD card to put the maps on (omit for Border 520)
The step-past-step pieces just have a few minutes. At that place's a tiny flake of work to get the maps requested, which and then puts you into a queue where your map request is processed and ultimately a link e-mailed to you a few hours later. Thus the 'blistering' time. So there's a few more minutes to copy the maps to your expansion carte du jour. Of grade, there'south no reason yous demand to sit down in that location and picket paint dry out. Just similar you wouldn't sit and watch dough rise.
You can get whatever size of Micro-SD card. I've tested all 3 Edge units using a variety of cards from 4GB to a highest capacity 32GB cards. I had no problems there with the latest firmware on whatever of them. About of the maps you'll create are less than 1GB in size, and then a 16GB card is more than than sufficient.
Notation that these steps require the Garmin Edge 520, 705, 800, 810, or 1000. All three of these units take mapping capabilities. This won't piece of work on the Garmin Edge 20, 25, 200, 500, or 510. Those units don't support the mapping office. Nor will it work on any other 3rd party units. Sorry!
Part I: Downloading the maps
This entire post is 'made possible past' OpenStreet maps, which are complimentary community driven maps. Openstreet maps have get in many areas just as expert equally maps from traditional providers. And best of all, they're free. The below site simply does all the hard-work that you lot used to have to exercise manually a few years ago if you wanted to utilise OpenStreet maps. Now, it's literally as easy as 1.2.3.
Start up, going to the site. Which, will bring you here:

(Note: In that location are a few other free sites out in that location, only none offer as simple an interface, nor equally widespread a geographic mapset to download)
You'll want to then cull 'Routable Bicycle' equally the map type.
Choose Routable Bicycle:

Now you'll select which maps y'all want. Because highly detailed maps similar these can be somewhat big, you'll likely need to pickup a cheap Micro-SD card. Some smaller maps may fit directly on your Edge device, but but if you're talking a adequately small area. For me, I like to load upward maps for anywhere nearby I might ride.
In any case, you'll first by choosing your continent, then land. In some areas (such as the U.s. and Canada), you'll also choose the state/province.

In my case, I went ahead and selected North America, so Usa, then Washington State. You lot'll meet how the map then will zoom in and bear witness me the 'tiles' that represent Washington Land. Tiles are ways that the unabridged world can exist broken down into consumable map chunks. Tiles don't usually map directly to states, but rather to big swaths of land – ideally designed to keep tile sizes somewhat consistent.
You can see beneath that it'south highlighted all tiles that 'cover' Washington Land.

Now, if you lot plan to venture outside your selected area – or if you desire to cull a smaller area, merely enable 'Manual tile pick', which allows yous to just option and cull exactly which areas yous demand.

For my trip to Seattle, I did just this. I narrowed it down to only the local area that I was probable to ride in. This would reduce my download time, as well as my transfer times later on to my device. Simply, if you programme to take the maps around for a while on your device, choose a larger fix so you e'er have coverage.

Once that'south done you'll get ahead and enter in your east-mail address to build the map. I'll explain this in a second.

The service works past generating the maps for you based on your specifications. This means information technology takes a bit of fourth dimension, sorta like putting in an guild at a eating place. To do this it places y'all into a queue, and your e-mail address is merely used to notify you when your maps are ready.

Y'all'll get an eastward-mail a couple seconds later on with a link that you can go to and check the condition of your map creation:

The filibuster may range from a few minutes to a few hours. No worries, when it's done information technology'll ship y'all another e-mail and you tin go pickup your files then:

With that, click on the link to be taken to download the maps. Once there, you'll see you have a few options. The only one we're going to pay attention to is the one ending with 'gmapsupp.nil'. This is essentially a self-contained map file ready to drop correct onto your Garmin.

With that, download the file someplace handy (like your desktop or downloads folder), and we'll come dorsum to it in a second.
I should bespeak out that there's a 'Donate' push button on that site (I accept no affiliation with it, nor practise I even know them or ever contacted them). Obviously, skilful karma dictates that if you observe their (free/community hosted) service valuable, sending a couple bucks their style is probably wise – peculiarly given how much money yous're saving.
Part 2: Installing the maps
Note: For the Border 520, see the next section for the Part Ii applicable to the Edge 520.
Next comes the easy part. The file yous downloaded is a standard Zip file, which ways the bodily map file is within information technology. Just like a packet from FedEx. So you'll become ahead and open up the Zip file to access the map file inside (gmapsupp.img).

Now have your Micro-SD card and insert it into your computer via the Micro-SD card adapter that likely came with it, or stick information technology into the Edge unit of measurement and plug that into your computer and admission information technology via that way. Notation, on the Edge 520, yous'll only connect your Border 520 directly to your computer and it'll prove equally a USB bulldoze. Follow the beneath instructions equally normal from there.
When you do so you'll now have a blank card ready to dump some files on…err, a single file. Commencement you'll create a directory on it chosen GARMIN .

Then, simply copy/movement the gmapsupp.img file right inside the GARMIN directory on your Micro-SD card.

And just like that, y'all're washed. Well, do recollect to put the Micro-SD card in the slot if you oasis't done and so yet.

Ok, now we're done – for existent this time.
Part Two: Border 520-specific instructions:

Now, the Edge 520 is slightly different than all other Garmin units. The reason being that the other units have a micro-SD card slot that you stick the maps on, whereas the Border 520 doesn't. Instead it has internal storage (105MB total,~49MB free on a default unit). What you'll exist doing is replacing the 'Global Basemap' with one local to your surface area of riding that's far more detailed. Annotation however that y'all've simply got about 98MB of space to play with once you remove the 49MB default basemap file. And of course you desire to go out some infinite for your actual activeness files, Strava segments, courses, and workouts (all of which are tiny, a few megabytes in total). Elementary math is 100KB (.1MB) per hr of GPS activity files.
For the almost part, the steps are identical to above, and then instead of re-writing them, I'll just tell you lot what to do differently. Let's dive correct in!
1) Download the map section of interest per the 'Part 1: Downloading the Maps' section (again for the Border 520, remember to keep information technology small*: See notation at cease of this section!).
two) Plug-in your Garmin Edge 520 to your computer.
iii) Within the \Garmin folder on the Edge 520, you'll find the gmapbmap.img file (Disc Image File). Make a backup copy of this on your computer for long-term safe keeping.
4) Inside the \Garmin folder on the Edge 520, delete the gmapbmap.img file (subsequently yous've copied it elsewhere). Note: If on a Mac, y'all must now empty your Trash bin, otherwise yous won't reclaim the free infinite. This is not required on Windows.
5) Copy the gmapsupp.img map file yous downloaded into the \Garmin binder on your Edge 520.
6) On the Edge 520, rename that map file gmapsupp.img to gmapbmap.img – don't worry if you can't see the .IMG extension, merely rename information technology togmapbmap, similar beneath.


7) There is nix actress you need to practice on the Edge 520 itself as far equally configuring maps – information technology'll happen automatically, so you tin can ignore Role 3 of the instructions.
8) Washed, go exterior and ride!
If you travel elsewhere, you'll want to either copy back the fill-in file to the Border 520 (overwriting your detailed maps), or but download detailed maps for the region you're travelling to.
*When looking at the size and picking tiles on the site using transmission tile selection, you tin can run into the size on the left side. The original map file you'll delete will be 49MB (gmapsupp.img). After that, y'all've still got another roughly 49MB of default free infinite to work with (for a total of ~98MB). Again I'd leave at to the lowest degree five-10MB for activity/segment/workout/course files though – so aim for less than 90MB for your map site.

Part 3: Enabling and using the maps

When yous outset turn on the Edge for the starting time time with the new maps, information technology'll inventory the maps so make them available to y'all. Depending on how big a mapset you created, this may take a few seconds – or a few minutes. Don't worry, just let it consummate.
Once that's done, the map should exist set up to utilize. In the unlikely event your new mapset isn't enabled, you lot can do and then manually. It's pretty quick and easy.

Here'southward how to manually enable the map layer (once again, only if for some reason it'southward non enabled), on each of the units out there today (side annotation: fiets merely means 'bike' in Dutch – thus OpenBikeMap):
Edge 705: Menu > Settings > Map > Side by side to "Openfietsmap Light" select the checkbox under 'Show'
Border 800: Carte du jour > Wrench Icon > System > Map > Map Information/Select Map > Select "Openfietsmap Lite" and choose Enable
Edge 810: Wrench Icon > Action Profiles > Your activity profile name > Navigation > Map > Map Data/Select Map > Select "Openfietsmap Lite" and choose Enable
One time you lot've got the maps enabled (if that didn't happen), then you're ready to use them.
Information technology should be noted that these maps are fully routable, and also include plenty of POI's (Points of Involvement).

To demonstrate this, you can see how I can search for various nearby eateries and find results:


And then you lot'll see how it provides routable directions on streets or fifty-fifty paths in this example. For each step along the mode it'll provide 'Turn left on Maple Street' type directions:


Yous can of grade always enter in a specific accost or other destination, and information technology'll route to that. And if you simply accept created a course online (you can do that free on Garmin Connect and transfer it to your Edge), then information technology'll provide the map information for that course as it routes.
With that, you're ready to roll (quite literally). Go forth and savor!
As always, cheers for reading!
deffellstraindich.blogspot.com
Source: https://www.dcrainmaker.com/2013/05/download-garmin-705800810.html
0 Response to "How to Upload Routes to Garmin 810"
Post a Comment